Free Sex Videos

Monday, June 29, 2009

little firecracker

I know. I know - another 4th of July style. I'm sure you are probably all so sick of seeing these but they have been so much fun to do. But thankfully for you, this will probably be the last one since we will be leaving here in the next day or 2 for the holiday.
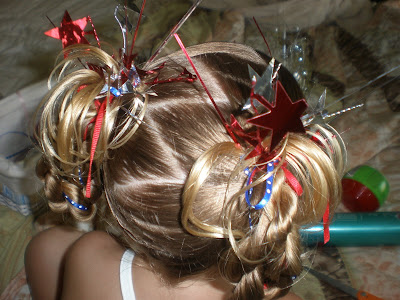
First - I know you have all seen these. I was at the dollar store the other day & thought I have to get those - they would be perfect coming out of my girlie's hair. This is what you see on the top of the hair.
We started by doing our 2 pigtails with a zig zag part.

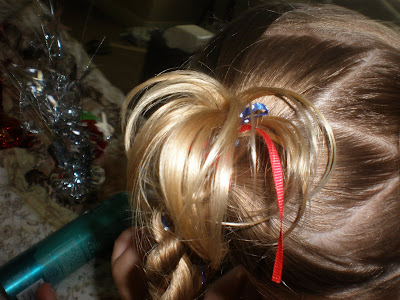
Next, add 2 different ribbons into the elastic. You are going to split the hair in half to do your corkscrew twist so you want one ribbon for each half.
Go ahead with your corkscrew twist.
Pull it back up & secure with an elastic. With the ribbon that was left hanging out, I just tied together in a bow.
As I was blow drying just the ends of her hair, I wrapped the ends around my fingers while the heat was on it to give it the curled over effect - so it looks like your firework. If your girlie's hair is a little more straight & doesn't want to cooperate, then pull out the curling iron & curl those ends over the pigtails. Spray to hold.
Clipped off a few pieces from the fireworks we got at the dollar store & just stuck them in all around the piggies enough so they would stay & not fall out. It's perfect because you can choose how many you want in there or how long or short you want them.
Super simple & there's your little firework girl!!
top view:
our front view:

Classic Style: The Low Chignon

Sunday, June 28, 2009

let's go for a star...again

I know I've already done a star - but we're just so excited for the fourth. If it looks a little lopsided to you on the left - it is:) We're not always perfect!! There are lots of pictures for those of you who are going to attempt this in hopes to making this easier on you.
This parts similar to the last star that I showed but you only need an elastic for each point of the star. Start out in the very front making a smal triangle for your point of your star.
Make the next 2 points by making a triangle off of the front point.
Add that front hair to your next set of points.
Here's a side view of what we've done so far:
So now, we need to bring our side back towards the center so just part the hair from the middle toward just an inch or two under the hair (look at picture)
I just sectioned the last 3 elastics off of the middle part. This might sound confusing but I'll try to explain my best. See right in the center - I parted a triangle - that is what where my bottom-middle point is going but before I put my elastic in - I need to do that right bottom point. So section off your triangle & clip back. Then part off from the triangle a small section of hair so you can add your elastic. Then bring that hair up & add to the triangle & add elastic there also. Make sense?
Mirror the same thing for the left bottom point (this is where I didn't even mine so much with the right bottom point - do better than I did:) Then bring ALL of the hair & what is left into a side pony - not necessarily making it even for that last point because a messy bun goes here & hides it.
To make the star stick out, we grabbed some ribbon, thread it on a very thick needle (you can also buy scrapbooking needles - it works perfect) & start at the very top point. I pulled more than half of the ribbon through the elastic to hold it in place - then just start wrapping around the hair all the way down to define your star. As you go around the elastics, wrap around them to also hide the elastics. End on your side pony.
Go back, do the other side the same way, also ending on your side pony.
Once I got to the end with both sides, I just tied a cute little bow around my messy bun.
Here's a side view from the bun.
Front view (for those who keep asking for a front view & I'm so bad at doing:)

Friday, June 26, 2009

another short style

My niece slept over the other night & the girls wanted twinner hair (is twinner a word?). My little niece's hair isn't long & it's very thin - so I was thinking what can I do for both of them with their hair up & out of their way - since they were on their way to gymnastics.
Here gives you an idea about how long her hair is:
We started from the bottom, making our way up. Just add 2 elastics. On short hair, this works AWESOME because it keeps the hair up all day long, instead of little whispies falling down & having to clip them up.
Do your next row & adding 3 elastics & dividing the first row of hair to go into each of the 2nd row of elastics.
Now pull the rest of the hair into 2 piggies. Make sure to remember to include the hair from the 2nd row, as shown. Once you have your 2 piggies in, do a tuck under knot or whatever you call it - & so the hair is flipped on top of the pony.
Curl the piggies
& you are finished!! If you were ambitious - you could do one more row of elastics before adding your piggies but since I had 2 girls hair to do - we didn't because of time.
So here's the long version. This is my girlie. The only difference that we did was with each elastic, we did a tuck under knot with it.
Here are the 2 little girlies together (of course the onery one is mine:) Same style - but looks different because of the length of the hair.
view from the back:

Tuesday, June 23, 2009

Long Fringe Style With Bangs


This style may be achieved with a bride's real hair, or with extensions.
Photo Courtesy of Beverly Johnson

Saturday, June 20, 2009

blooming flower

My little girl has been asking me to do a flower in her hair for the last week. I had to get creative & use some pipe cleaners to help out but it turned out darling. We went to Wal-Mart & I had several moms come check out & ask how we did it. These pictures don't do it justice. Super easy to do though!!

I started by pulling all the hair straight back in a higher pony tail. To keep the hair in a perfect bent shape to make a petal, I braided pipe cleaner into each braid. I stuck the pipe cleaner under the elastic, just enough to keep it still, section my 3 strand braid & add the pipe cleaner to the middle strand & begin braiding.
This is what it looked like when I was finished. Cut the pipe cleaner to the end of the braid so it's not sticking out. Also, try to match one closest to your girlie's hair so it blends better. We probably could have gone with an even lighter color.
I did 5 braids on the outside of the pony tail so you have a section of unbraided hair in the middle section that will be your center of the flower.
Bend the braid, starting with the top middle, into a petal shape. It's okay if hair is sticking out in the middle, you are going to curl it anyway. I really only ended up using about one bobby pin per petal to hold the flower down at the base, but this one kept sticking up right in the front, so we put a pin in to keep it from doing that.
Make your head around the pony tail & you can see the shape of the flower.
That hair that is left in the middle, curl all of it.

I added an elastic to bunch up her curls so that it wasn't so long - if your girlie's hair isn't as long, you wouldn't need to do it. I did this just for the purpose that you can actually see the flower.
I pinned the curls so it looked like a curly little ball in the middle to make the center of the flower. I had a mom email me & ask to explain how I pin up her curls - if you already know - skip this - I put the bobby pin in about 2/3 of the way down on the curl & then I just stick it into the bun. As simple as that!!
I thought I had the whole picture flipped thing figured out - but I guess not. Sorry!! Here's the finished product. We actually ended up putting a small bow in on the side.
Here's the best shot I could get with the entire flower.

**I failed to mention for the post below: I know you are all looking at it & thinking I do not want to take those elastics out. If you haven't figured this out - try it next time: a SEAM RIPPER. Works awesome!! & it's quick - just be careful not to "rip" or cut any of her hair out. It's soft on her head & fast. If you are nervous you are going to cut her hair then use the tail of a comb to lift it up & then rip through the elastic.