Free Sex Videos

Saturday, March 30, 2013

How To Make Braided Bun Prom Hairstyle

How To Make Braided Bun Prom Hairstyle
How To Style :
  • Step 1 : Brush through the whole of your hair using your hair brush. Then use your styling comb to backcomb the top section of your hair, Smooth over using your hair brush and tie back into a high ponytail.
  • Step 2 : Now it’s time to split the ponytail into two separate sections to start your prom hairstyle, making sure they are equal in size. Tie one section of the hair with a thin hair band to keep it out of the way.
  • Step 3 : Braid right down to the ends of the hair section and secure with a thin hair band. Repeat this step with the other section of hair.
  • Step 4 : Now you need to criss-cross the braids, so take the right braid under the left braid and wrap around the base of the bun as far as you can go, then secure in place with a bobby pin.
  • Step 5 : Now take the left braid and wrap it around the base of the bun, starting from the right side. Secure in place with a bobby pin, repeating the above step, Finish off by spritzing some hairspray all over to hold in place.
Source : bobbyglam.com
Tutorials You Should also see :

Make Naturally Curly For Your Hair

Make Naturally Curly For Your Hair
How to Do :
Step 1 : Twist strands of your hair (the thicker the strand, the looser the curl) until you can even see the twisting at the roots. Wrap the strand around (on your scalp) into a little circle, then pin it down with 2 bobby pins, criss-crossing each other. and Repeat for all your hair.
Step 2 : after sleeping on the little spiral buns. Remove pins and let spirals un-twirl.
Step 3 : Use your fingers to separate waves ...do not brush out.
Step 4 : The smaller sections and more twisted spiral buns you do all over your head, the curlier it turns out.

Source : Big Curls with Tiny Buns
Tutorials You Should also see :

Thursday, March 28, 2013

Quick romantic hairstyle for short hair

Quick romantic hairstyle for short hair
Steps : 
Step 1. Using your curling iron, curl all over, being sure to direct the curls away from your face. Spritz with hairspray.
Step 2. Determine the placement of your headband and slip it over the crown of your head, pin into place.
Step 3. Starting from the front section, begin twisting and tucking sections of hair up and over the headband, it should start resembling a crown.
Step 4. Continue twisting and tucking, being sure to fill in any gaps.
Step 5. If you have very short hair in the back, use your comb to hold the hair in place while you blast with hairspray.
Step 6. Set the style with hairspray.

Tutorials You Should also see :

Tuesday, March 26, 2013

Corrective Colours


Corrective Colours

Correctors are used to counteract or neutralise tones found in the skin so foundation and concealer can work better.


Lilac/Lavender 

If you suffer from yellowing under the eyes, or your tan/warm skin is looking dull and grey, try a lilac primer or concealer. It brighten and evens your skin.


Green & Yellow Counteracts - Red/Pink 

If you suffer from rosacea or reddish skin try green or yellow concealer or primer, it will counteract the red tone in the skin. 
If you have cool skin tone try green or you have warmer skin tone try the yellow. 


Peach/Pink/Orange Correctors


Peach/Pink/Orange concealer brighten grey/purple/blue/green/dark under eye circles but keep in mind once you apply the corrector you may need to go back over the area with a foundation or concealer that matches your skin to ensure it blends out evenly. 

Light Pink for pale Skin 
Peach for Medium Skin
Orange for Dark Skin 


Monday, March 25, 2013

How To Make Twist Doughnut Bun For Your Hair

How To Make Twist Doughnut Bun For Your Hair

Source : join the mood
Tutorials You Should also see :

Saturday, March 23, 2013

Britney Spears in The Makeup Chair


How I would do it...

I would love to do Britney's makeup, 
and this is how I would do it...


On the left how Britney's makeup is done,
On the right how I would do her makeup.


With a little help from photo shop I add some makeup!

Britney suffers from break outs and oily skin, 
I would start with Smashbox Photo Finish Light 
(after using a cleanse, toner and moisturiser of course)

Her under eyes looked a little grey, I used a peach concealer to counteract that. 

Taking a lighter shade of foundation I highlight the skin under the eyes, chin and forehead and then use a foundation shade that matches her neck to help even her skin.

With Britney going from blonde to brown her brows need to also change, I used a warm brown eyebrow pencil to define them.

I picked a lighter peachy/pink blush for Britney's cheeks. Britney already has strong red colours in her skin so a peachy/pink would neutralise that. 

Finally for lipstick I blended the lip liner more and added a sheer pink lipstick! Done!  

Which celebrities makeup would you like to do or redo??


Tuesday, March 19, 2013

Make a Side Swept Hairstyle

Make a Side Swept Hairstyle

Source : jointhemood
Tutorials You Should also see :

Monday, March 18, 2013

Make a Spring ponyTail For Your Hair

Make a Spring  ponyTail For Your Hair
Make a Spring ponyTail For Your Hair

Tutorials You Should also see :

Sunday, March 17, 2013

Finally Finished Foundation Series!


Flawless Foundation For Beginners!


Step One: Cleanse 
Pink Grapefruit Face Wash.
Make sure your make-up is going on fresh skin, this will make sure it goes on smoother and lasts longer!


Step Two: Tone
Simple facial toner.
A toner is just a liquid similar to water that rinses off any left over cleanser or dirt. Wipe it over the skin on a cotton pad!


Step Three: Moisturise 
Moisturise Simple Hydrating Light Moisturiser
Moisturise actually gives your foundation something to hold on so its very important!


Make sure you leave your skin settle for at least 5 minutes once you have completed these steps!


Step Four: Primer
Primer Nivea Daily Essentials Hydration Primer Normal/Comb
Not everyone needs a primer, but if you are going to use one, you apply it after your Moisturiser, not before your moisturiser and not instead of your moisturiser, after your moisturiser, Yep! :)


Step Five: Foundation
Foundation Loreal True Match W1
                 Bourjois 10 Hour Sleep Effect
I mixed up two foundations to get my prefect tone, texture and shade. It takes a lot of trial and error to find that out but when you do you wont forget it!


I use my F20 brush to apply it http://www.blankcanvascosmetics.com/products/hot-pink-and-black-f20-duo-set.html


You don't need a brush or sponge or any type of tool, feel free to use your finger tips, I like to pat in the foundation because it gives great coverage and looks great, I think its the heat from your fingers blends it so well!


And we're done!


Saturday, March 16, 2013

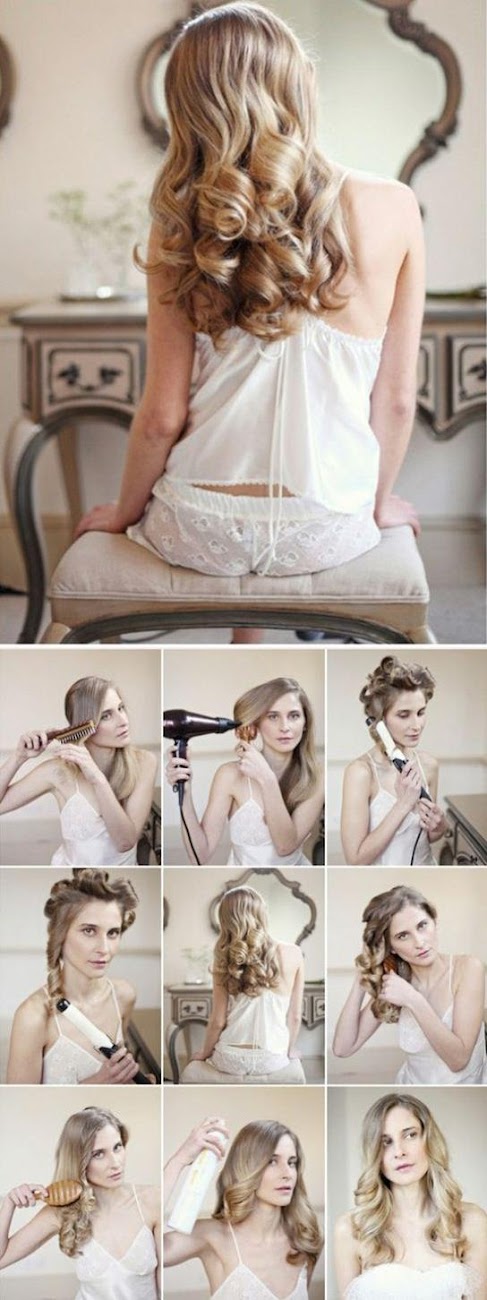
Make a Romantic Waves Bridal For Your Hair

How To Make a Romantic Waves Bridal For Your Hair

Tutorials You Should also see :

Wednesday, March 13, 2013

Fishtail Braid Updo hair Tutorial

Fishtail Braid Updo hair Tutorial
How to Style :
  • Step 1 : Gathering your hair to the side and secure it with a thin rubber hair tie. Divide it into two sections.
  • Step 2 : Hold both sections in one hand, separated by your pointer finger, and use your other hand to grab a small piece from the outside of one section.
  • Step 3 & 4 : Repeat step 2 until you’ve just about reached the end and secure it with an elastic. It’s even better if it’s messy, so pull out some strands and roughen up the braid a bit.
  • Step 5 : If you want to turn your fishtail into an updo, start by rolling the braid inward and up towards the nape of your neck.
  • Step 6 : Secure the rolled bun with bobby pins. The looser and messier the bun, the better!
Source : Do the Fishtail
Tutorials You Should also see :

Tuesday, March 12, 2013

Buying Foundation Online


So You Wanna Buy A Foundation Online 
But You Have No Idea What Shade To Pick????


Here is what I do....

Let's say I want to get the "NYX HD Studio Photogenic Foundation"
and I need to work out the right shade for me,

Step 1:
Look for Swatches online -


Here is a swatch of the NYX foundation in Sand Beige (Thanks to Nina's page)


Step 2:

Search for a foundation swatch you already use - 

Here is a swatch of an ELF foundation I already own, 
I use shade "Sand" 


Step 3:

Compare foundation swatches

You can see how the Elf "Sand" and NYX "Sand Beige" swatches are similar.


DONE!!


How To Make Elegant Crown Braid

How To Make Elegant Crown Braid
How To Style :
  • Step 1 : First hand-dry the hair with Surf Spray and then White Hair Powder to give it a roughed-up texture with lots of grip.
  • Step 2 : Create an exaggerated side part, then back-comb crown for a bit to added volume.
  • Step 3 : Isolate a large section of hair on the thick side of the part and braid into a traditional three-strand braid all the way down to the ends. Use a clear elastic to secure. Use fingers to gently pull braid apart so it’s wider. Rub braid with palm of hand to create a little bit of fuzziness.
  • Step 4 : Pull The hair into a ponytail by the nape of the neck, securing with a bungee hair-tie. Keep ponytail slightly loose to preserve volume. Back-comb length of ponytail for added fullness.
  • Step 5 : Tuck the tail of the braid into the chignon, securing with a bobby pin.
  • Step 6 : Fine-tune the hair with fingers and use hairspray all over the hair to set.
Source : Glamour Editors
Tutorials You Should also see :

Monday, March 11, 2013

How To Make a Chignon Bun

How To Make a Chignon Bun
Steps :
1 : Gather all of your hair in one hand.
2 : Start twisting all of your hair in your hand around 1-2 fingers. Hold your starting point in your other hand as if it were a hair tie (if you have hair that is thick and slippery you may just want to put a hair tie in.
3 : Continue to wrap your twisted pony around your starting point until you reach the end of the pony, continually twisting your finger at the same time to keep the ponytail tight.
4 : Secure the end of your pony with a bobby pin, making sure that it goes as far in towards the center of the bun as possible.
5 : Add extra bobby pins to ensure that the bun will stay in place. I usually use about 3-4, if you have thicker hair or many layers, you may have to use more.
6 : Toussle your hair slightly to give it a 'messy, effortless' look and sprits it a few more times with some hairspray or styling product if needed.

Source : My Non-Do, Hair-Do

Tutorials You Should also see :

Saturday, March 9, 2013

Beachy Waves Hair Tutorial

Beachy Waves Hair Tutorial
How to Style :
  • Step 1 : Get a Curling iron that get really hot.
  • Step 2 : Warp the hair away from the face, only using the inside part of the iron, for about 15 seconds and don't use the clamp.
  • Step 3 : Repeat step 2 around your entire head, grabbing small sections and wrapping around the iron.
  • Step 4 : Spray hair with a shine serum with a little hold.
  • Step 5 : Scrunch up hair and rake your fingers from roots to tips so that the waves aren't too perfect.
Source : Beachy Waves

Tutorials You Should also see :
Tutorials You Should also see : ... how to make hair chalking on dark hair ... Make a Faux Bob For Long Hair · How To Make Retro Updo Fishtail · No Heat Curls ...
hairstyles-tutorial.blogspot.com/2013/03/how-to-make-glamorous-hair-bun. html

Step 2 : Roll it over itself to create a donut shape. Step 3 : Cut the donut shape so it becomes a long roll. Step 4 : Trim the ends so the roll is the length of the base ...
hairstyles-tutorial.blogspot.com/2013/03/the-crafty-sock-bun-hairstyle.html

Wednesday, March 6, 2013

Make a Faux Bob For Long Hair

Make a Faux Bob For Long Hair
Steps :
  • 1 : First Part your hair below your ears.
  • 2 : Tease the hair below your ears (this creates a cushion for you to pin to).
  • 3 : Tuck the rest of your hair under the teased section.
  • 4 : Keep tucking your hair under and pinning onto your teased section as you go until it feels secure.
Source : A Bob for a Day

Tutorials You Should also see :

How To Make Retro Updo Fishtail

How To Make Retro Updo Fishtail
Source : Fishtail

hair care products for women


Tutorials You Should also see :

Tuesday, March 5, 2013

No Heat Curls Tutorial

No Heat Curls Tutorial
Products For Curly Hair "amazon.com"

How To Style :
  • Step 1 : Get your hair a little damp .then Put the elastic headband around your head (partly over your forehead) .
  • Step 2 : Get a section of hair and Loop it around the headband and add the hair to your next section . and Repeat around the entire headband .
  • Step 3 : Get a good nights rest .
  • Step 4 : Take off the headband when you wake up in the morning.
  • Step 5 : Then run your fingers through (Don’t worry, if you look like Shirley Temple, the curls will relax within a few minutes).
Source : Hair Tutorial: No Heat Curl

Tutorials You Should also see :